ADF : Drag and Drop Between Collections(Tables) – Step by Step

ADF provides ability to Drag and Drop items from one place to another place on the page. This simple tutorial will guide how to achieve this.

Requirements
  • JDeveloper 11.1.2.2
  • Oracle XE database with HR Schema in place.
Use Case
  • Two tables are created on the page. Countries Table and Selected Countries Table.
  • Rows are dragged from Countries table and dropped into Selected Countries Table
  • Row should get added to the Selected Countries Table when dropped into it.
  • Row should be deleted from source Countries table when successfully dropped into destination Selected Countries Table.


Setting up Business Components


First we will be creating a new table SELECTED_COUNTRIES which is exact replica of COUNTRIES table in HR Schema.
After this Create Entity object and View Object of both the tables(SELECTED_COUNTRIES and (COUNTRIES)  and add these to AppModule.
From AppModule window -> Data Model Tab, shuttle the two newly created View Objects(SelectedCountriesView and CountriesView).
Below are the two VO which you can see. We have already shuttle them. (Please ignore “Rest of the VOs” in this screenshots and also in rest of screenshots in the post)
Creating JSF Page
Now create a new Jsf page in ViewController project. Lets give this page name – DragDropExample.jsf
Select One Column Footer (Stretched with Splitter) theme of the page as shown below.
Stretch the splitter to be in the middle of the page which divides the page in two halves.
Now go to Data Control . Drag n Drop CountriesView1 to the first part of the page and create a read only table with single row selection.
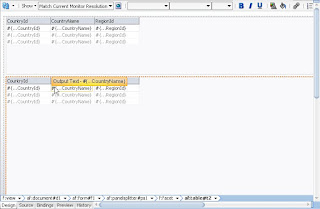
Do the same thing with SelectedCountries data control on the second half of the page and create read only table with single row selection.
After this the page will look like below screenshot.
Adding ADF Drag – Drop components to our tables.

Now its the time to add drag and drop behavior to our tables so that we can drag from Countries table and drop in Selected Countries table.
From the Component Palette select the drag source and drag it under Countries table in structure window.
In the Drag Source Property Inspector give these values.
DragDropEndListener :- This is a method call to managed bean, which perform the tasks on the Source Collection after it has been dragged. For example , in our demo , we need to delete the row when it is being drag and dropped to the target SelectCountries table. So the code for deleting the row from the source collection goes into this method.
For this we need to create a new Managed Bean.
Lets create a new Bean by clicking arrow on DragDropEndListener field like below:
And create a new method named endListener and make EL of DragDropEndListener to
 #{pageFlowScope.DragDropDemo.endListener}
We are all set on source side.
Now lets do the destination table side things.
From Component Palette selection Collection Drop Target. Drag this under SelectedCountries Table. This will pop up a window asking for the drop target. This again needs to be a method from managed bean. Make a new method named “dragRow” like below screenshot.
Below will be the values of Collection Drop Component in Property Inspector.
Model name needs to be same as Discriminant in drop source component. This is used in the dragRow method we will look below.Full Method name :- DragDropDemo.dragRow

And below is utility method addNewRow.
Full Method name :- DragDropDemo.addNewRow

And finally below is the code for DragDropEndListener method.
Full Method Name : DragDropDemo.endListener

Note that CountriesView1Iterator and SelectedCountriesView1Iterator used in the code are actual executable in DragDropExample.jsf. Below is screenshot for same.

Now we are all done. Do a Save all and compile everything and run the page DragDropExample.jsf.

You will see that you can drag n drop a row from Countries table to Selected Countries table. The row gets added on drop and gets deleted from the source table.

Hope this tutorial was helpful. Please feel free to ask any questions or doubts if you have any.

Happy Learning !!

Rohan Walia

get the current viewId or url in ADF using ControllerContext

ControllerContext – Context class for per request per web application Controller information. It have various method when you need to perform
action programmatically .It Provide per-request information about the controller state for a web application.

Use getInstance() method to get the context which includes:

1. ViewPortContext (current view rendered in a browser window, a modal dialog or a region).
2. Global ViewActivity URL (url of a view activity in an unbounded task flow).
3. Local view activity url.
4. Task flow url view activity view id.
5. Savepoint restore url.

getCurrentRootViewPort() -Returns a ViewPortContext corresponding to the current root view port. The root view port is the view port for the current browser window/tab.

getGlobalViewActivityURL(ViewId) – Generate a URL for a view activity in the unbounded task flow.
Note: the view activity being referenced must be in the unbounded task flow. URL access to view activities within bounded task flows is not supported. It is caller’s responsibility to ensure that the view activity exists.

Returns:
a properly encounded URL that will result in navigation to the specified view activity.

getSavePointRestoreURL(savePointId) -Generates a URL to a save point restore activity within the current web application.

getViewActivityViewID(localViewId) -Generate view ID for a view activity inside a task flow definition. The view ID can be used when creating a UIViewRoot representing this view activity so that it can be launched in a dialog window. It is caller’s responsibility to ensure that the view activity exists.

Get the current View Id

 
ControllerContext.getInstance().getCurrentViewPort().getViewId();

Get request URL of a view activity

 
String url = ControllerContext.getInstance().getGlobalViewActivityURL(viewId)

or 

String viewId = "/department"; 
String url = ControllerContext.getInstance().getGlobalViewActivityURL(viewId);

Navigate programmatically among view activities:

 
ControllerContext.getInstance().getCurrentViewPort().setViewId("Department");  //Ensure "Department" is a valid view id in current task flow 

prepareSession method in ADF

You can override prepareSession() in your custom Application Module class to do session-specific initializations, such as invoking a stored procedure to initialize the database state for the specific user, store user information, set application-wide configuration parameters based on the user and so on. You may extend the default implementation, as is often nessesary, in order to satisfy various pre-condtions such as user authorization etc. For example, to lock a specific view (E.g. UserView) to only show records with the users own initials (CLB in my case), the following could be done:.The framework invokes prepareSession() when the Application Module is first checked-out from the Application Module pool for a new user session.

Example:

@Override
protected void prepareSession(Session session) {

super.prepareSession(session);

// do session-specific initializations
}

For example we can write the code i.e

 
  public void prepareSession(SessionData sessionData) {
    super.prepareSession(sessionData);
    // Retrieve the J2EE user ID
    String authenticatedUser = getUserPrincipalName();

    if ((authenticatedUser != null) && 
        (authenticatedUser.trim().length() > 0)) {
      DBTransactionImpl dbTransaction = (DBTransactionImpl)getDBTransaction();
      // Parameter for database procedure
      String pApplication = "TUHRA";
      // Transaction statement with procedure call
      CallableStatement callableStmt = 
        dbTransaction.createCallableStatement(("BEGIN " + 
                                               "security_pkg.set_security_context(?, ?); " + 
                                               "END;"), 0);
      try {
        // Register parameters and call procedure
        callableStmt.setString(1, authenticatedUser);
        callableStmt.setString(2, pApplication);
        callableStmt.execute();
      } catch (SQLException sqlExcept) {
        throw new JboException(sqlExcept);
      } finally {
        try {
          if (callableStmt != null) {
            callableStmt.close();
          }
        } catch (SQLException closeExcept) {
          throw new JboException(closeExcept);
        }
      }
    }
  }